
Chapter 15
System settings
In Tesela, people are managed under “Administration” and the system is adjusted under “Settings”. This side-menu group brings together what changes how the portal looks, what it offers and where it obtains data from, without touching code or deploying anything. This is a chapter for administrators.
The “Settings” group is seen by whoever manages profiles. “Imagery providers”, “External services” and “AI assistant” additionally require a permission of their own, because they decide where data comes from or what is sent to a third party.
Site identity
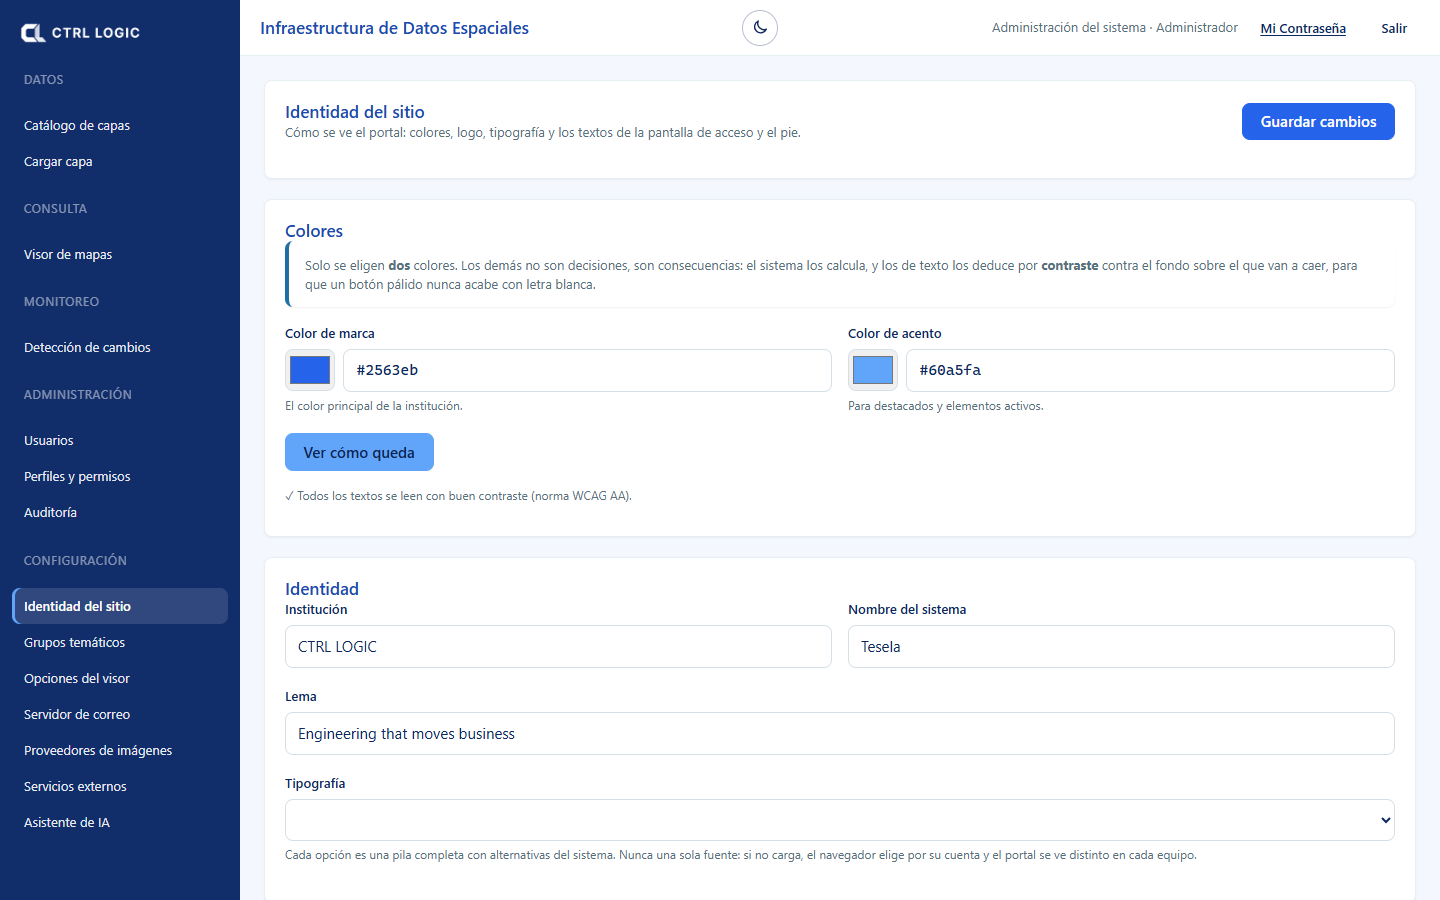
Defines how the portal looks: colors, logo, typography and the texts of the sign-in screen and the footer. Changes are visible immediately across the whole portal when you click “Save changes”.
- Colors: only two are chosen, the “Brand color” and the “Accent color”. The others are calculated, and text colors are derived by contrast. “See how it looks” applies a preview that only you see until you save. The system checks the contrast against the WCAG AA standard and warns you if a combination is hard to read.
- Identity: “Institution”, “System name”, “Tagline” and “Typography” (Inter, system, Source Sans or Serif).
- Images: “Logo” (menu, headers and PDFs), “Tab icon” (favicon), “Light version of the logo” (over the dark sign-in panel) and “Sign-in background image”. Each is uploaded with “Upload” or “Change” and removed with “Remove”.
- Sign-in screen: headline, message and the color overlay on the background image (color and opacity).
- Contact and footer: email, phone, address and footer text.
Thematic groups
Groups are the folders of the viewer’s layer tree. Whoever uploads a layer chooses its group from this list, so variants such as “Geología” and “Geologia” do not appear. Here you can create a group (“New group”, with a “Suggested ISO category”), rename it, deactivate it and change its order with the up and down arrows: the order of the table is the order in the viewer. If the name resembles an existing one, the system asks “Is it the same group?”. Renaming a group applies the change to all its layers at once.
Viewer options
Decides which tools the viewer offers to each type of visitor. Each tool has three levels:
| Level | Who sees it |
|---|---|
| Public | Everyone, without signing in. |
| Signed-in only | Staff who sign in. |
| Hidden | Nobody: it is removed from the viewer. |
The options are grouped under “Navigation”, “Query and analysis”, “Tools” and “Downloads and services”, and include those covered in this manual: “Assistant”, “Drone mission planner”, “Field observations”, “Hotspots (NASA FIRMS)”, “Data sources and licenses” or “Monitoring: change detection”. The functions without which the map cannot be used (viewing all of Bolivia, zooming in, zooming out and identifying) are always public. Click “Save changes”: the viewer applies them on the next load.
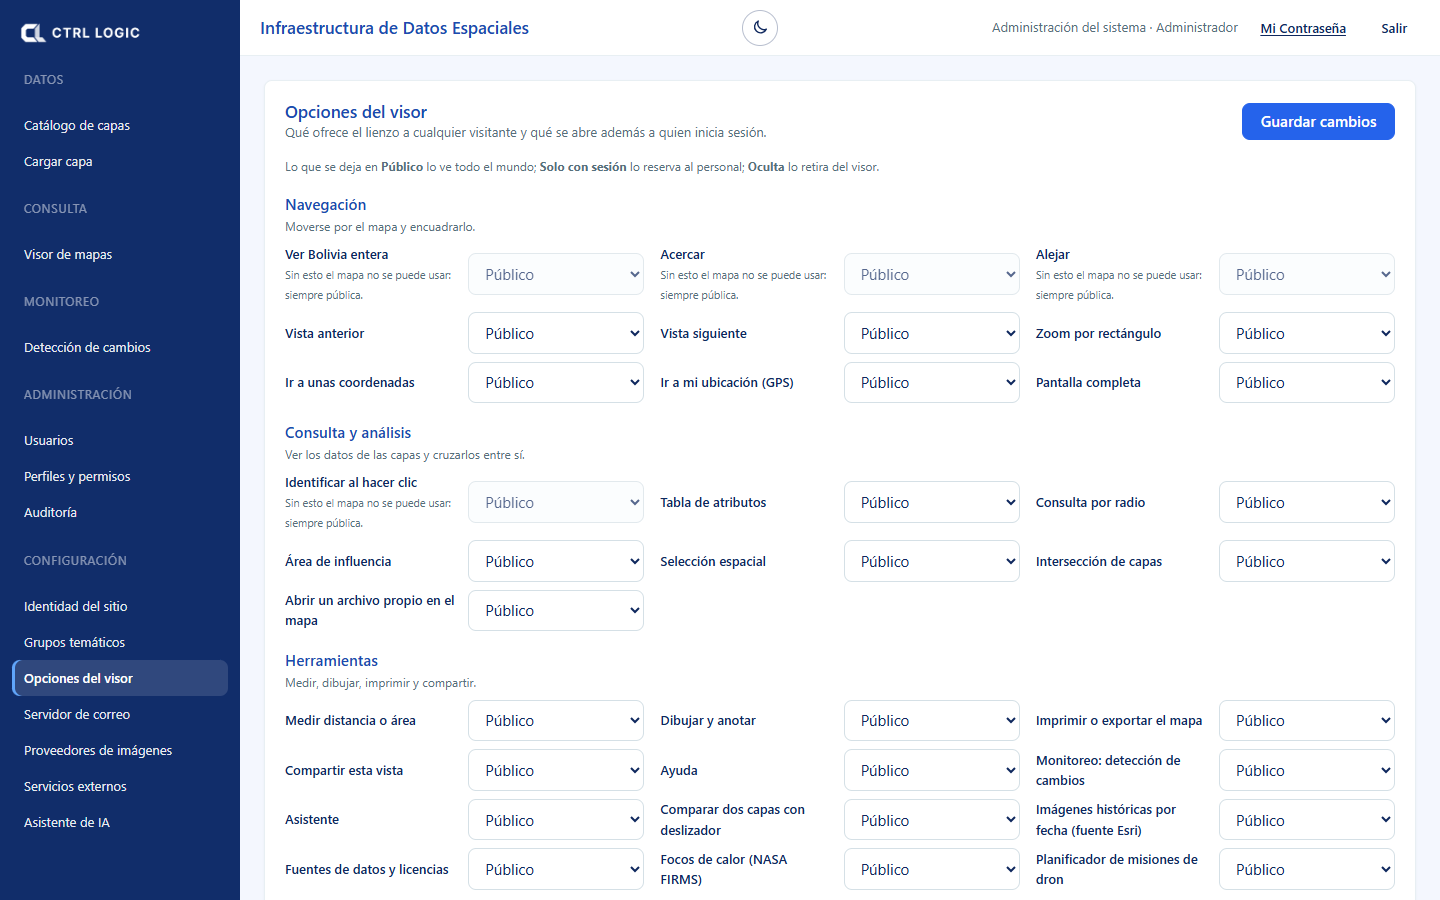
Some tools additionally depend on a permission. For example, “Field” appears only to those who can review field data, and the assistant to those who can use it, even if the option is public.
Mail server
Activation codes, password recovery and the monthly review of internal access go out through here. As long as it is not active, the portal does not offer account creation or password recovery.
- Fill in “Server”, “Port” (587 with STARTTLS or 465 with encryption from the start), “Username” and the password. The password is stored encrypted and is never shown again.
- Enter the sender’s name and email, and the “Administrator email”, where the list of accounts with internal access arrives on the 1st of each month.
- Save and click “Send test email”. Only when the test works does the server go into use.
Imagery providers
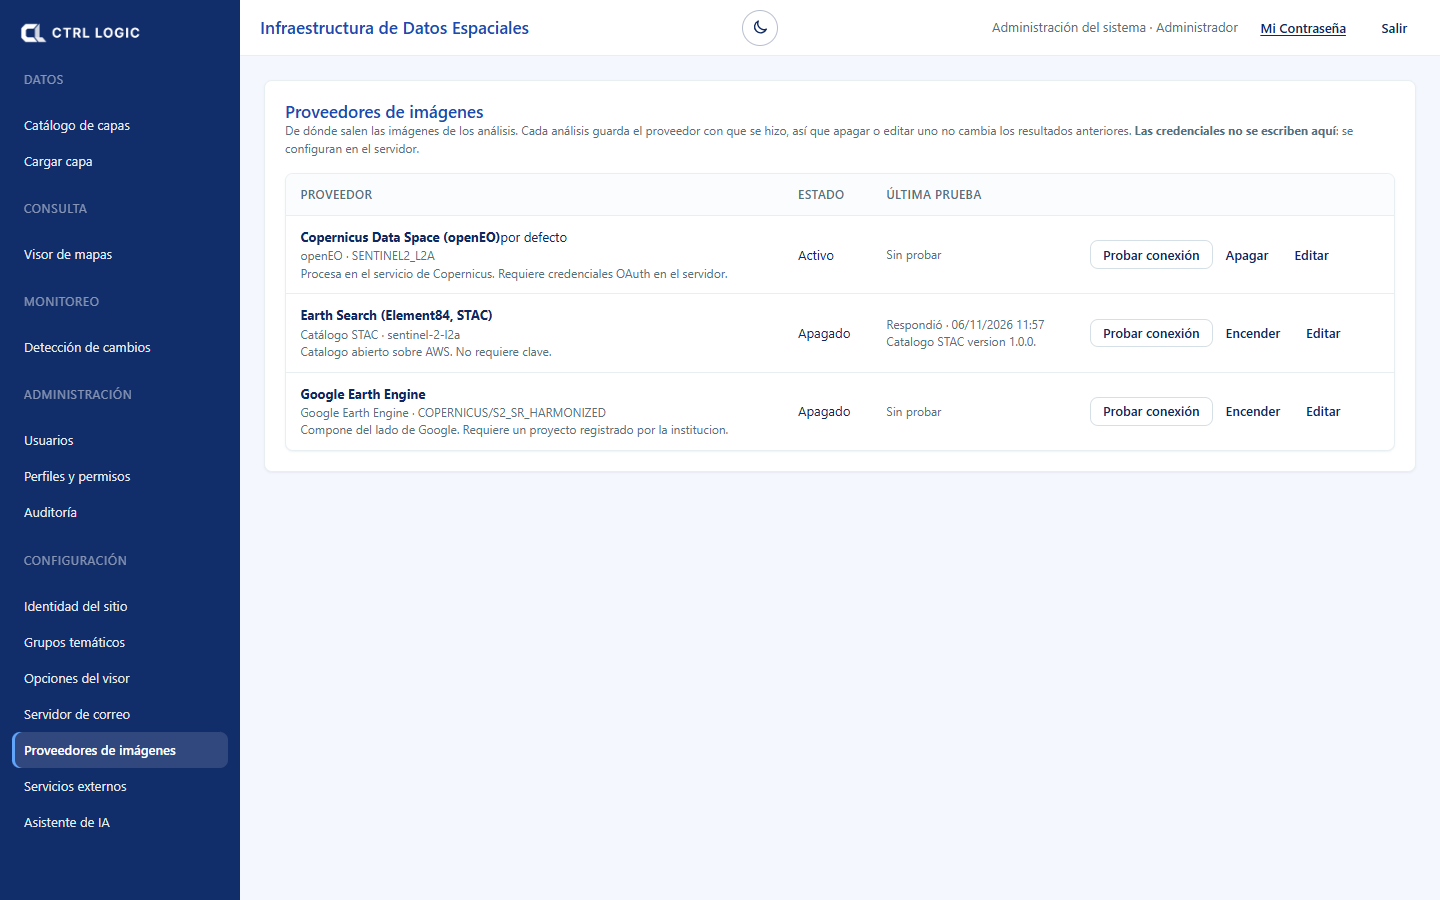
Indicates where the satellite imagery for the analyses comes from. Each analysis stores the provider with which it was made, so turning off or editing one does not change earlier results.
| Provider | Note |
|---|---|
| Copernicus Data Space (openEO) | Processes on the Copernicus service. Requires OAuth credentials on the server. It is the default. |
| Earth Search (Element84, STAC) | Open catalog on AWS. Requires no key. |
| Google Earth Engine | Composites on Google’s side. Requires a project registered by the institution. |
For each provider you can “Test connection”, “Turn off” or “Turn on”, “Make default” and “Edit” (name, address and collection). Credentials are not entered in the interface: they are configured on the server.
External services
Allows the viewer to display map services from other institutions (WMS, WFS or XYZ tiles). The data belongs to third parties and is read-only: the API queries it from the server and the browser never connects to it.
Registering a WMS service
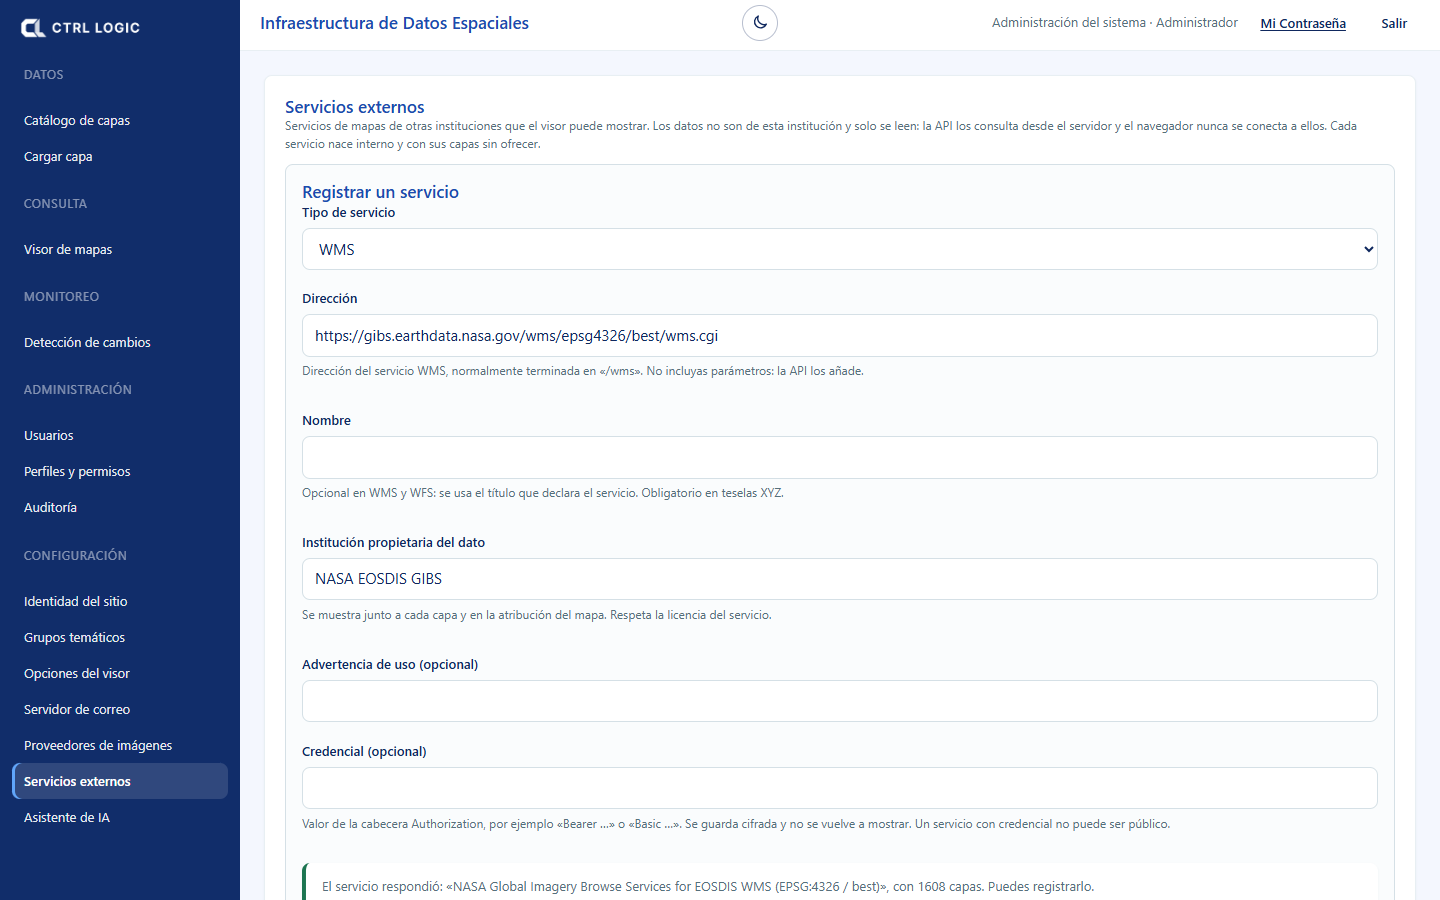
- Under “Register a service”, choose the “Service type” (WMS) and enter the “Address”, normally ending in “/wms” and without parameters.
- Enter the “Institution that owns the data”. It is shown next to each layer and in the map attribution; respect the service’s license. Optionally, add a “Usage warning” or a “Credential” (Authorization header, which is stored encrypted).
- Click “Test connection”. If it responds, you will see the service title and how many layers it publishes.
- Click “Register service”.
- Under “Registered services”, open the service and tick the layers that are offered in the viewer (“Layers offered in the viewer”).
- Each service is created as “Internal” and with its layers not offered. If you want any visitor to see it, click “Make public” and confirm. A service with a credential cannot be public.
Once registered, you can “Check” that it still responds and that its catalog has not changed, “Turn off”, “Turn on”, “Edit” or “Remove” (its layers stop being shown).
AI assistant
Here you choose the model provider (Claude from Anthropic, ChatGPT from OpenAI or Gemini from Google) and its key. The key is stored encrypted on the server and does not leave it. The steps and the privacy notices are in the chapter “Assistant”.
Summary
- “Site identity” and “Viewer options” change the appearance and the tools without deploying anything.
- “Thematic groups” orders the layer tree.
- The “Mail server” must be tested for registration and password recovery to work.
- Imagery provider credentials are configured on the server, not on the screen.
- External services are created as internal; make them public only after reviewing their license.